Are you looking to revamp your hobby room and add a personal touch to its décor? Look no further! In this blog post, we will explore 10 exciting and creative DIY projects that will elevate the style and functionality of your hobby room. From repurposing old furniture for storage and display to designing and sewing your own vibrant curtain panels, there’s something for everyone. Whether you’re a crafting aficionado or an avid reader, these projects will not only spruce up your hobby room but also inspire you to spend more time in it. So roll up your sleeves, grab your crafting materials, and get ready to transform your space into a personalized haven for your hobbies and creativity. Let’s dive into these 10 DIY projects to elevate your hobby room’s décor!
Repurpose old furniture for storage and display
Old furniture can easily be given a new lease on life by repurposing it for storage and display. Whether it’s an old dresser, a worn-out bookshelf, or a tired coffee table, there are countless ways to transform these pieces into functional and stylish storage solutions for your home.
One option is to convert an old dresser into a statement piece for your entryway or living room. By removing some of the drawers and adding baskets or bins in their place, you can create an eye-catching storage unit that also serves as a display area for books, photo frames, or decorative items.
Another idea is to repurpose a tired bookshelf into a stylish and practical storage piece. By painting it in a fresh coat of your favorite color and adding some decorative hooks or knobs, you can easily create a charming storage solution for coats, bags, and hats in your entryway or mudroom.
Finally, an old coffee table can be transformed into a functional storage ottoman by adding a padded cushion top and some clever internal storage compartments. This not only gives new life to an old piece of furniture but also provides a versatile storage solution for blankets, magazines, or other living room essentials.
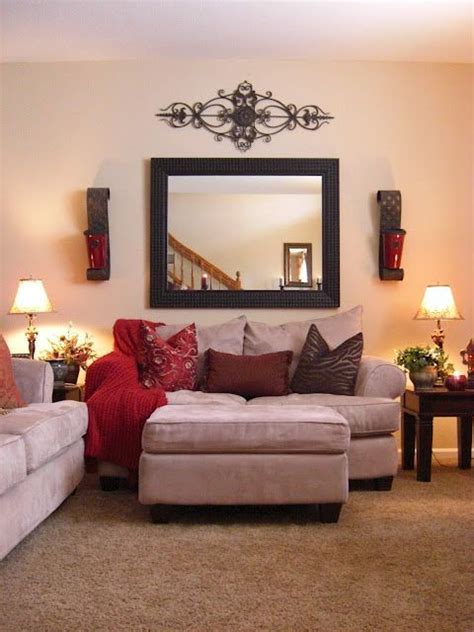
Create a gallery wall with your favorite art pieces
If you have a collection of art pieces that you want to showcase in your home, creating a gallery wall is the perfect way to do so. Whether you have paintings, photographs, or prints, a gallery wall allows you to display them in an organized and visually appealing way.
Start by selecting a variety of art pieces that you love and that complement each other. Consider the color scheme, style, and size of the pieces to create a cohesive look. Once you have your art pieces selected, it’s time to plan out the layout of your gallery wall.
Use painter’s tape to map out where each art piece will hang on the wall. This will allow you to experiment with different arrangements before making any holes. Once you’re happy with the layout, it’s time to hang your art pieces using picture hangers or adhesive hooks.
Creating a gallery wall with your favorite art pieces not only adds a personal touch to your home decor, but it also serves as a conversation starter and a showcase of your unique style and interests.
Make a personalized wall clock from craft materials
Make a personalized wall clock from craft materials
Creating a personalized wall clock from craft materials can be a fun and rewarding project. Whether you’re looking to add a unique touch to your home decor or seeking a thoughtful gift idea, making your own clock allows you to customize the design to suit your style and preferences.
Start by gathering your craft materials, such as a clock mechanism, wooden base, paint, paintbrushes, and decorative elements like beads or stickers. Consider the color scheme and theme you’d like for your clock, and choose materials that align with your vision.
Next, use your creativity to decorate the wooden base of the clock. You can paint it with vibrant colors, create intricate designs, or add personal touches such as photos or quotes. Experiment with different textures and techniques to make your clock visually appealing and reflective of your creativity.
Once your base is decorated and dried, carefully attach the clock mechanism according to the manufacturer’s instructions. Test the hands to ensure they move smoothly and adjust as needed. Finally, hang your personalized clock on the wall and marvel at the unique piece of functional art you’ve created.
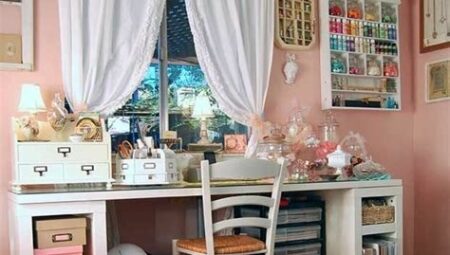
Construct a custom-built crafting table with ample storage
Are you tired of not having enough space to store all of your crafting supplies? Do you find yourself constantly searching for the perfect crafting table that meets all of your needs? Look no further, because you can construct your very own custom-built crafting table with ample storage! This project will not only provide you with the perfect crafting space, but it will also give you a sense of accomplishment and pride in your craft room.
First, you’ll need to gather the necessary materials for this project. This will include wood, screws, a drill, and any other tools needed to build the table. Once you have all the materials, you can start constructing the table according to your desired size and dimensions. The key here is to make sure you have plenty of storage space, such as drawers, shelves, or cubbies, to keep all of your crafting supplies organized and easily accessible.
As you assemble the table, you can customize it to fit your personal style. Whether you prefer a sleek, modern look or a more rustic, farmhouse feel, the design options are endless. You can even add a pop of color with a coat of paint or decorative knobs and pulls to make it uniquely yours.
Once your custom-built crafting table is complete, you’ll finally have a designated workspace that is not only functional but also adds a touch of personality to your craft room. Say goodbye to clutter and disorganization, and hello to a crafting space that meets all of your needs!
Design and sew your own vibrant curtain panels
When it comes to adding a pop of color and personality to your living space, one of the easiest and most effective ways to do so is by designing and sewing your own vibrant curtain panels. Not only can this project be a fun and creative endeavor, but it also allows you to customize your curtains to perfectly match your existing decor and express your unique style.
Start by selecting a fabric that speaks to you and complements the color scheme of the room. Whether you opt for a bold, geometric print or a more subtle, textured fabric, the key is to choose something that will make a statement and elevate the overall look of the space.
Next, take accurate measurements of your windows to ensure that your curtain panels will fit perfectly. This is also the time to decide on the length and width of the panels, as well as any additional details such as trim or embellishments that you may want to add.
Once you have all your materials and measurements ready, it’s time to get sewing! Whether you’re a novice or a seasoned seamstress, there are countless resources available online for step-by-step instructions and tutorials to guide you through the process. Before you know it, you’ll have a set of vibrant curtain panels that are not only unique to you, but also serve as a stunning focal point in your home.
Craft unique and functional storage baskets
When it comes to organizing your home, storage baskets are the perfect solution for keeping clutter at bay while adding a touch of style to your space. Instead of purchasing generic storage baskets from the store, why not craft your own unique and functional storage baskets? This DIY project allows you to customize the size, shape, and design of the baskets to perfectly fit your storage needs while adding a personal touch to your home decor.
One way to craft your own storage baskets is by using natural materials such as jute or cotton rope. You can create a coiled rope basket by wrapping and stitching the rope into a pattern of your choice. Not only is this a fun and creative process, but it also results in a sturdy and durable storage basket that can be used to hold anything from blankets to toys to books.
If you’re looking for a more colorful and playful storage solution, consider using fabric to create lined storage baskets. By choosing fabrics in various patterns and colors, you can design storage baskets that complement your decor and add a pop of color to any room. Whether you opt for a round, square, or rectangular shape, lined fabric baskets are versatile and can be used for organizing items in any room of the house.
No matter which materials or design you choose, crafting your own storage baskets allows you to create functional and stylish organizers that perfectly suit your home. With a few simple supplies and a bit of creativity, you can elevate your home organization and add a handmade touch to your living space.
Build a pegboard organizer for your tools and supplies
Are you tired of constantly searching for your tools and supplies every time you need them? A pegboard organizer is the perfect solution for keeping your workspace neat and tidy. With a few simple materials and some creativity, you can create a customized pegboard that will not only keep everything in its place but also add a touch of style to your crafting area.
Start by gathering a pegboard, some pegboard hooks, and a variety of containers such as baskets, jars, and shelves. The first step is to paint or decorate the pegboard to match your personal style. Once the pegboard is ready, arrange the containers and hooks according to your storage needs, making sure to leave enough space between each item for easy access.
Use strong and durable hooks to hang heavier items such as scissors, rulers, and cutting mats. For smaller items like pens, brushes, and scissors, attach small containers to the pegboard and label them for easy identification. You can also use shelves to hold containers of buttons, beads, or any other small supplies to keep them off your workspace.
Not only does a pegboard organizer keep your tools and supplies organized, but it also serves as a decorative feature in your crafting space. You can get creative with the layout and design, incorporating your favorite colors and patterns to make it uniquely yours. With a pegboard organizer, you can say goodbye to clutter and hello to a more efficient and visually appealing workspace.
Make a DIY memo board for inspiration and reminders
Creating a memo board is a great way to stay organized and inspired. Not only does it serve as a functional tool for keeping track of important reminders, but it also adds a personal touch to your home decor.
When making your own memo board, consider using upcycled materials to add to its charm and character. Old picture frames, cork boards, or even an old window can be repurposed into a unique and stylish memo board. By using materials you already have, you can save money and reduce waste.
Once you have your base, get creative with the design. Use colorful fabric, ribbon, or paint to add flair to your memo board. You can also add clips, pins, or hooks for hanging notes, photos, or other items. Personalize it to match your home decor or to reflect your own unique style.
Displaying your favorite quotes, photos, or mementos on your DIY memo board can provide daily inspiration and reminders of what’s important to you. Whether it’s in your home office, kitchen, or entryway, a memo board can be both functional and decorative, adding a touch of personality to any space.
Create a cozy reading nook with a homemade cushion
When it comes to creating a cozy reading nook, one of the most essential elements is a comfortable cushion. Instead of purchasing one, why not try making your own homemade cushion? You can pick out the fabric that best suits your style and preferences, and tailor the size and shape to fit your reading nook perfectly.
Start by selecting a durable and soft fabric that will provide the comfort and support you need for long reading sessions. Whether you prefer a modern print or a classic solid color, the choice is entirely up to you. Once you have your fabric, you can measure and cut it to the desired dimensions for your cushion.
Next, you’ll need to sew the fabric together, leaving one side open for stuffing. Choose a high-quality cushion filling, such as foam or polyester fiberfill, to ensure that your homemade cushion is plush and inviting. Once you’ve stuffed the cushion to your liking, you can sew the final side closed and add any decorative touches, such as buttons or piping, if desired.
With your homemade cushion complete, you can now place it in your reading nook to create a cozy and inviting space for relaxing with your favorite book. Pair it with a soft throw blanket and a few decorative pillows to complete the look and make your reading nook a comfortable retreat in your home.
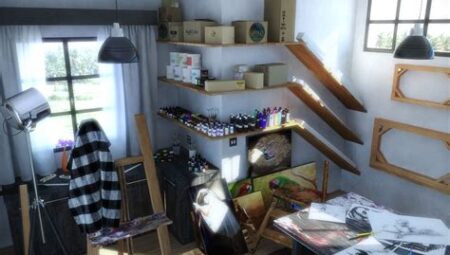
Design and build a stylish craft supply shelving unit
When it comes to organizing your craft supplies, a stylish shelving unit can make all the difference. Not only does it provide a functional storage solution, but it also adds a decorative element to your crafting space. With a few materials and some creativity, you can design and build your own custom shelving unit that suits your style and storage needs.
Start by measuring the space where you want to install the shelving unit. Consider the dimensions of the shelves, as well as the overall height and width of the unit. This will ensure that your shelving unit fits perfectly in the designated area and maximizes storage potential.
Next, gather your materials, including wood boards, brackets, screws, and a drill. You can customize the look of your shelving unit by choosing different types of wood and finishes. Whether you prefer a rustic, modern, or eclectic design, there are endless options to create a shelving unit that complements your crafting space.
Once you have all the materials, it’s time to assemble the shelving unit. Attach the brackets to the wall, making sure they are level and secure. Then, place the wood boards on top of the brackets and screw them in place. You can arrange the shelves at different heights to accommodate various craft supplies, such as paint bottles, fabric rolls, and storage bins.
Frequently Asked Questions
How can I repurpose old furniture for storage and display in my hobby room?
You can repurpose old furniture by adding shelves, drawers, or hooks to create storage and display space. For example, you can turn an old dresser into a storage unit for your craft supplies or use an old bookshelf to display your finished projects.
What are some ideas for creating a gallery wall with my favorite art pieces in my hobby room?
You can create a gallery wall by arranging your favorite art pieces, photographs, and prints in a cohesive and visually appealing way. You can mix and match frames, sizes, and styles to create a personalized and eclectic display.
How can I make a personalized wall clock from craft materials for my hobby room?
You can make a personalized wall clock by using a basic clock mechanism and adding your own creative touch. You can use a variety of materials such as wood, fabric, or paper to make a unique and customized clock that reflects your personal style.
What is the best way to construct a custom-built crafting table with ample storage for my hobby room?
You can construct a custom-built crafting table by designing a table with built-in shelves, drawers, and compartments to store and organize your craft supplies. You can also add additional features such as a built-in pegboard or a designated space for your sewing machine or other tools.
How can I craft unique and functional storage baskets for my hobby room?
You can craft unique and functional storage baskets by using a variety of materials such as fabric, rope, or even recycled paper. You can customize the size, shape, and design of the baskets to fit your specific storage needs and style preferences.
What are some tips for building a pegboard organizer for my tools and supplies in my hobby room?
You can build a pegboard organizer by installing a pegboard on the wall and adding hooks, shelves, and small containers to store and display your tools and supplies. You can also use the pegboard to hang frequently used items within easy reach while keeping your workspace organized and clutter-free.
How can I create a cozy reading nook with a homemade cushion in my hobby room?
You can create a cozy reading nook by making a homemade cushion for a window seat, bench, or chair in your hobby room. You can use foam padding and fabric to make a custom-sized cushion that fits your seating area and add throw pillows and a soft blanket to create a comfortable and inviting space for reading and relaxation.